First I add moisturiser, which is to ensure my skin is moist and refresh. This would allow the make up I use in this technique to stay on my skin longer and to ensure that it would not disappear if tempered with or touched. The type of moisturiser I used was E45 cream as it is all made from natural substances, which means that the make I use in this process does not affect my skin in anyway and if used the actor would not be happy if they reacted to the materials used.


The next stage is adding a smidgen of bronzer, which is where you use a make up brush you ensure the bronzer comes out smooth and flat. Using this would make the section of skin, where the bruise is being placed, smooth and to avoid uneven tones of skin colour. This would also help for the eye-shadow to mix with it, which would make the whole effect of the bruise even more effective. you can get this bronzer from any type of shop, but all you need to take into account is that it have to suit the colour of the actor, which is very important as you do not want them to look orange. This photo show the first type of eye-shadow needed for the base colour of our bruise which we want to achieve. Using a eye-shadow brush, would allow you to delicately apply the eye-shadow, so that it can form an actual looking styled bruise. The shape should be a little uneven so that it is more realistic as usually bruises are not in a specific shape. Using a fairly light colour means if the shape goes wrong it would not be as noticeable as if I used a darker colour it would mean I would have to start over.

These are the next types of colours I used. The first one was a shade up from the previous colour so it would make the colour before more visible to see. The next colour was added around the edge of the other two to show that the impact occurred more harshly around the edge, but also to bring out the bruise more. The final colour was to ensure that if I added too much of the darker brown I could blend it into my skin, so it would avoid me starting all over again, as that would be very time consuming.

This stage is using even darker colours, dark blue and darker brown. This is to emphasis how the bruise is coming out as just like a real one would do. The blue eye-shadow is to symbolise the most painful part of the bruise as usually this is whereas the the darker brown is to help blend all the colours I have used so far, to make a gradient of colour. As you can see in the picture,these colours are the most dominant colours, which makes the bruise look very realistic, which is ideal for our opening two minutes of our film.
This is the final result of making a bruise. This looks very much like a bruise as it has all the colours of one and suits the colour of the skin, meaning it doesn't look like it should not be there. However this shape may not be ideal for our film, as we should make it more like finger impressions, as if someone has grabbed someones arms. This may be ideal to be part of the protagonists make up regime as it could suggest domestic violence occurring in her life or something relatively similar.
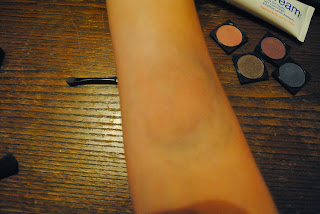
This is all of the equipment used to make this bruise. The equipment I used was, bronzer, make up brush, moisturiser, blusher brush (optional), eye-shadow applicator ( one of two preferably) and eye-shadows. These colours should consist of three colours being the same colour but different shades of this colour, a blue and a pale skin colour.


 The next stage is adding a smidgen of bronzer, which is where you use a make up brush you ensure the bronzer comes out smooth and flat. Using this would make the section of skin, where the bruise is being placed, smooth and to avoid uneven tones of skin colour. This would also help for the eye-shadow to mix with it, which would make the whole effect of the bruise even more effective. you can get this bronzer from any type of shop, but all you need to take into account is that it have to suit the colour of the actor, which is very important as you do not want them to look orange. This photo show the first type of eye-shadow needed for the base colour of our bruise which we want to achieve. Using a eye-shadow brush, would allow you to delicately apply the eye-shadow, so that it can form an actual looking styled bruise. The shape should be a little uneven so that it is more realistic as usually bruises are not in a specific shape. Using a fairly light colour means if the shape goes wrong it would not be as noticeable as if I used a darker colour it would mean I would have to start over.


No comments:
Post a Comment